@JGStew
Create Bigfix Content To Install Windows Software From Scratch
This is the final result: https://bigfix.me/fixlet/details/22625
This post will walk through the steps I take to create a fixlet/task to install a new piece of software using BigFix. This will be with the specific case of Visual Studio Code for Windows.
This may seem daunting, but I’m spelling this out in a lot of detail. Steps 3 & 7 are the hardest, and they are required even if you are using something other than BigFix. Step 9 can be difficult if you are not used to writing relevance, but it is really what makes BigFix so powerful, and is luckily very similar for all windows software.
Step 1: Download
Visit the vendor site: https://code.visualstudio.com/
Click the Download for Windows button.
The software will start to download in the browser after a few seconds. In this case, the file is VSCodeSetup-1.7.1.exe
Go to the browser downloads section to find the actual download URL.

In this case, the URL is https://az764295.vo.msecnd.net/stable/02611b40b24c9df2726ad8b33f5ef5f67ac30b44/VSCodeSetup-1.7.1.exe
Copy the URL into the clipboard
Step 2: VirusTotal
Sign in to VirusTotal
Go to the home page, click the URL tab
Paste the Download URL into the URL tab where it says Enter URL
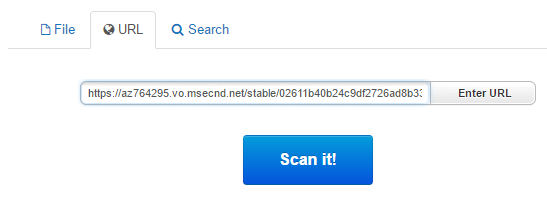
Click the Scan it! button
Go to the URL Analysis page: https://www.virustotal.com/en/url/ae6c705ae42d49dae10df490fab56d1ccb34835025c7d88f8db40247208f4466/analysis/
Click the Go to downloaded file analysis link. (this only works for files under a certain size)
In this case, you should end up here: https://www.virustotal.com/en/file/4f1a406321af2f90d16e5b753529d205e66d4f6eeaa5f925566c43b8f8e70638/analysis/1478216605/
Step 3: Determine Installer Type
From the VirusTotal analysis page, look for signs of the installer type, primarily under the File detail tab, but also the Additional Information tab.
Found “This installation was built with Inno Setup.” in the File detail tab, as well as “INNO, maxorder, appended, packed” which point to this being an Inno Setup installer type. The installer type is needed to determine what command line switches are needed to silently install the software.
There are a few different ways to do this for EXE installers. See another here.
Step 4: Create prefetch statement
The software installer is downloaded to bigfix clients using a prefetch statement, which includes the file size, sha1, sha256, and download URL.
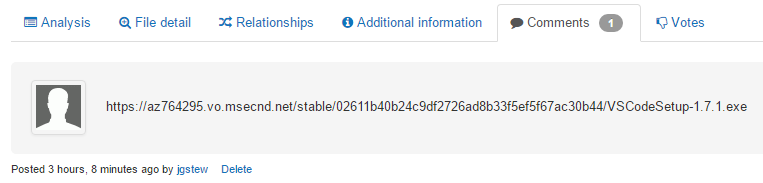
From the VirusTotal analysis page, click on the Comments tab.
Ensure that the most recent comment is the Download URL from above, otherwise paste the Download URL in the Leave your comment... box and click the post comment button.
Once that is completed, click the VirusTotal to Prefetch bookmarklet to generate the prefetch statement. The code for the bookmarklet is on GitHub.
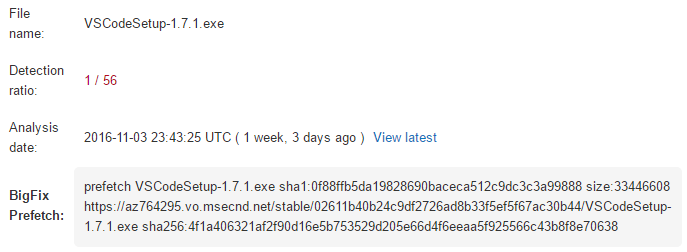
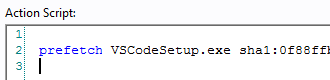
Copy the generated prefetch statement and save it. Remove the version info from the download file.
prefetch VSCodeSetup.exe sha1:0f88ffb5da19828690baceca512c9dc3c3a99888 size:33446608 https://az764295.vo.msecnd.net/stable/02611b40b24c9df2726ad8b33f5ef5f67ac30b44/VSCodeSetup-1.7.1.exe sha256:4f1a406321af2f90d16e5b753529d205e66d4f6eeaa5f925566c43b8f8e70638
You want to use VSCodeSetup.exe instead of VSCodeSetup-1.7.1.exe so that the rest of the actionscript doesn’t change for future versions.
Note: There are MANY ways to make prefetch statements, but this is the one I tend to prefer since I prefer to use VirusTotal in the first place.
Step 5: Create fixlet / task
In the BigFix console, click the Tools menu, select Create New Fixlet...
Change the Name: from “Custom Fixlet” to “Install/Upgrade: Visual Studio Code 1.7.1 - Windows”
Click the Actions tab
Paste in the Prefetch statement created in step 4.
Click the Relevance tab
Select the Computers which match all of the relevance clauses below radio button
Change the relevance “true” to “windows of operating system”
More relevance will be added later, but this is all we are going to add for now.
(Optional) Change the Create in site: from your opsite or Master Action Site to a custom site. Generally it is a good idea to keep as little as possible in the Master Action Site and if you create it in your opsite, then only you will be able to see it, which is not helpful for collaborating with other operators.

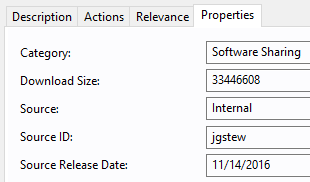
Click on the Properties tab
Paste the size value from the prefetch statement into the Download Size: field. For this example, it is 33446608
Enter your username in the Source ID: field. In my case, it is jgstew, but not for you.
Click OK to save the Fixlet. You may need to reauthenticate to the console.
Step 6: Test download through BigFix
On the newly created Fixlet, click the Take Action button.
Since this is a newly created item, you may have to enter the computer name of your test machine manually since it probably has not reported as applicable / relevant to this new fixlet yet.
Click the Enter device names radio button.
Enter the name of your windows test machine.
Click OK to deploy it to this test machine. You may need to reauthenticate to the console.
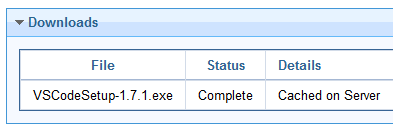
In the Action Summary tab, you should see a section called Downloads appear. It should provide some feedback as the root server downloads the file in the prefetch statement, and it should eventually have a status of Complete, with the details Cached on Server. This means the file has been successfully downloaded by the root server.
Once this happens successfully, then the download should happen on the windows test machine you targeted with the action.
Once the download completes, the test machine will report back a status of Failed. This is intentional, and what we want to see! In this case Failed means the applicability relevance wasn’t satisfied, which we haven’t written yet, so it SHOULD fail! As of right now, the applicability relevance is just windows of operating system which will be added to in step 9 so that the action no longer reports failure.
Click the Computers tab.
Double click on the action result for the windows test machine you targeted the action to, which will open the View Action Info window for this computer.
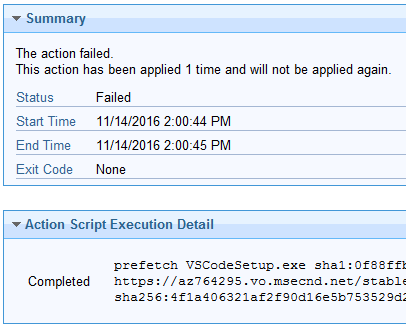
What you want to see here is Completed next to the prefetch line. This lets us know that the download succeeded on the targeted test machine. Remember, Failed is the status we want to see at this point in the process!
Close the View Action Info window.
Click the Stop button on this action.
Click the OK button on the Confirm Stop dialog.
Click the Summary tab for this action.
In the Source section, click the This action's source is the Fixlet message "Install/Upgrade: Visual Studio Code 1.7.1 - Windows" link to jump back to the origin fixlet.
Step 7: Test command line switches
Go to the test machine you targeted with the action to test the download using BigFix. (RDP)
Go to the download folder for the site the fixlet is in. In my case it is:
C:\Program Files (x86)\BigFix Enterprise\BES Client\__BESData\CustomSite_Public\__Download
but it will be different depending on the site.
Open a command window as admin and switch to this same directory.
cd "C:\Program Files (x86)\BigFix Enterprise\BES Client\__BESData\CustomSite_Public\__Download"
Then try the command line switches needed to silently install the software correctly.
In my case, I used command line switches from an existing Inno Setup example: https://www.bigfix.me/fixlet/details/6291
VSCodeSetup.exe /SP- /VERYSILENT /SUPPRESSMSGBOXES /NOCLOSEAPPLICATIONS /NOCANCEL /NORESTART /NORUN /MERGETASKS="!desktopicon"
This did install the software successfully, but Visual Studio Code opened up immediately after the installation finished. THIS IS A PROBLEM!!!
If something opens through the installer with BigFix, then it will be running as the SYSTEM account and invisible to any user on the system. It would be bad enough if it suddenly opened on the user unexpectedly, but having it run invisibly is in some ways even worse because it will cause the BigFix action to hang until the system is rebooted. BigFix won’t be able to do anything on the system and will be stuck until then.
I now need to figure out how to suppress Visual Studio Code from opening after installation. There are a couple of options to do this for Inno Setup installers.
Open regedit
Browse to the uninstall key for Visual Studio Code, which should be:
HKEY_LOCAL_MACHINE\SOFTWARE\WOW6432Node\Microsoft\Windows\CurrentVersion\Uninstall\{F8A2A208-72B3-4D61-95FC-8A65D340689B}_is1
Look for the value Inno Setup: Selected Tasks which was set to: associatewithfiles,addtopath,runcode
It seems highly likely that the offending task is runcode, which we can tell the installer not to run by adding it with a ! in the MERGETASKS list, like this: /MERGETASKS="!runcode,!desktopicon"
Now close Visual Studio Code
Open Add / Remove Programs or whatever it is called now and uninstall Visual Studio Code.
Now test the new silent command line option:
VSCodeSetup.exe /SP- /VERYSILENT /SUPPRESSMSGBOXES /NOCLOSEAPPLICATIONS /NOCANCEL /NORESTART /NORUN /MERGETASKS="!runcode,!desktopicon"
This works!!! It installed Visual Studio Code without opening it after the install!
Uninstall Visual Studio Code again
Now switch to the parent directory of the __Download folder, which in my case is: C:\Program Files (x86)\BigFix Enterprise\BES Client\__BESData\CustomSite_Public
This is the folder that BigFix will run the action from, so all paths need to be relative to this folder.
Now test the silent command switch from this location:
__Download\VSCodeSetup.exe /SP- /VERYSILENT /SUPPRESSMSGBOXES /NOCLOSEAPPLICATIONS /NOCANCEL /NORESTART /NORUN /MERGETASKS="!runcode,!desktopicon"
Once this is working, then it is time to test this in an actual BigFix action.
Uninstall Visual Studio Code once again. ( you are using a test machine, aren’t you?! )
Step 8: Test command line switches through BigFix action
Open the recently created Install/Upgrade: Visual Studio Code 1.7.1 - Windows Fixlet in the BigFix console, if not open already. (it should be at the end of Step 6)
Click the Edit button
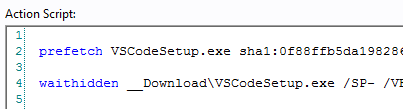
After the prefetch statement, add the install command line from the previous step:
waithidden __Download\VSCodeSetup.exe /SP- /VERYSILENT /SUPPRESSMSGBOXES /NOCLOSEAPPLICATIONS /NOCANCEL /NORESTART /NORUN /MERGETASKS="!runcode,!desktopicon"
Click OK to save your edits. You may need to reauthenticate to the console.
Double check and make sure Visual Studio Code is not installed on your test machine. Also, make sure you don’t have any command windows open to the __Download folder, or any files open there, otherwise it could prevent the client from clearing the __Download folder.
Click the Take Action button on the newly edited Fixlet.
You should be able to select your test machine from the list by now, otherwise enter it manually like in step 6.
Click OK to send the action to the test machine. You may need to reauthenticate to the console.
Wait for the action to run on the test machine. You will know it has run when the test machine reports back the status of Failed after reporting the status of Running. Remember, it SHOULD report back Failed because we still haven’t written the applicability relevance yet… that is next.
You might want to check the test machine’s BigFix client log file, since it often is finished running the action before the status updates in the BigFix console. The log file should be in this folder: C:\Program Files (x86)\BigFix Enterprise\BES Client\__BESData\__Global\Logs with the name YYYYMMDD.log but reflecting the current yearmonthday.
The final status in the console should look similar to this:
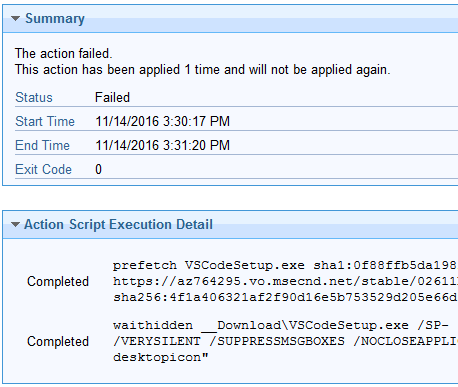
At this point, make sure Visual Studio Code is installed on the test machines and opens successfully, because it should!
Stop the action
Go back to the Source by clicking on the link This action's source is the Fixlet message "Install/Upgrade: Visual Studio Code 1.7.1 - Windows" in the Summary tab
Now assuming that worked, time to write the relevance to detect Visual Studio Code. Keep the software installed for this part in the process, which is the next step below.
Step 9: Write Relevance to detect software install
If not already available, then download or install the BigFix Fixlet Debugger on the test machine: https://bigfix.me/fixlet/details/5021
The version of the Fixlet Debugger you use does not need to exactly match the version of the BigFix client installed, particularly when it comes to writing the initial relevance. Once you get the relevance written, it isn’t a bad idea to test it in the version of Fixlet Debugger that is the closest match to the oldest version of the BigFix client you support in your environment, as well as the newest version of the Fixlet Debugger. This extra testing is rarely needed, but good to keep in mind.
Open the Fixlet Debugger as Admin
Open regedit
Find the Visual Studio Code uninstall key, which should be located under one of the following:
HKEY_LOCAL_MACHINE\SOFTWARE\Microsoft\Windows\CurrentVersion\UninstallHKEY_LOCAL_MACHINE\SOFTWARE\WOW6432Node\Microsoft\Windows\CurrentVersion\Uninstall
As mentioned above, it should be located here on a 64bit windows system:
HKEY_LOCAL_MACHINE\SOFTWARE\WOW6432Node\Microsoft\Windows\CurrentVersion\Uninstall\{F8A2A208-72B3-4D61-95FC-8A65D340689B}_is1
We are going to write relevance that will search all of the keys under the Uninstall keys for Visual Studio Code.
Start with this relevance, which will give the total number of software items installed with entries in add/remove programs:
number of keys of keys "HKEY_LOCAL_MACHINE\SOFTWARE\Microsoft\Windows\CurrentVersion\Uninstall" of (x64 registries; x32 registries)
This should return a number larger than 0, which represents the number of items under both HKEY_LOCAL_MACHINE\SOFTWARE\Microsoft\Windows\CurrentVersion\Uninstall AND HKEY_LOCAL_MACHINE\SOFTWARE\WOW6432Node\Microsoft\Windows\CurrentVersion\Uninstall on a 64bit system. In the case of a 32bit system, there will only be an entry for HKEY_LOCAL_MACHINE\SOFTWARE\Microsoft\Windows\CurrentVersion\Uninstall
Now, note the value DisplayName in the uninstall entry for Visual Studio Code. It should contain Microsoft Visual Studio Code.
Now add this to the relevance check, like so:
number of keys whose(value "DisplayName" of it as string starts with "Microsoft Visual Studio Code") of keys "HKEY_LOCAL_MACHINE\SOFTWARE\Microsoft\Windows\CurrentVersion\Uninstall" of (x64 registries; x32 registries)
This should return a result of 1, which means the relevance is properly detecting the existence of the installed software.
This is actually sufficient for detecting if Visual Studio Code is installed or not and could be used in our fixlet to only install Visual Studio Code if it is not already installed by using the following relevance:
not exists keys whose(value "DisplayName" of it as string starts with "Microsoft Visual Studio Code") of keys "HKEY_LOCAL_MACHINE\SOFTWARE\Microsoft\Windows\CurrentVersion\Uninstall" of (x64 registries; x32 registries)
Adding exists in front of the relevance in place of number of would cause the relevance to only be TRUE on systems that already have Visual Studio Code installed. This is the opposite of what we want. By putting not in front, the relevance will only be TRUE on systems that DO NOT already have Visual Studio Code installed, which is exactly what we want. If we only wanted the fixlet to run on systems that do not have Visual Studio Code installed at all, then we could stop here.
To go a step further, what if we wanted to install this version of Visual Studio Code if it is not already installed OR an older version is installed? We add a check to see if the current or newer version of Visual Studio Code is installed, and then put not in front of that.
not exists keys whose(exists values "DisplayName" whose(it as string starts with "Microsoft Visual Studio Code") of it AND exists values "DisplayVersion" whose(it as string as version >= "1.7.1" as version) of it) of keys "HKEY_LOCAL_MACHINE\SOFTWARE\Microsoft\Windows\CurrentVersion\Uninstall" of (x64 registries; x32 registries)
We don’t want to install Visual Studio Code 1.7.1 if it is already installed OR if a newer version is installed and that is what this final relevance will do. This allows the same relevance to be used for Installs OR Upgrades.
You can also create relevance just for upgrades with slight modifications, like this:
exists keys whose(exists values "DisplayName" whose(it as string starts with "Microsoft Visual Studio Code") of it AND exists values "DisplayVersion" whose(it as string as version < "1.7.1" as version) of it) of keys "HKEY_LOCAL_MACHINE\SOFTWARE\Microsoft\Windows\CurrentVersion\Uninstall" of (x64 registries; x32 registries)
This relevance will only be applicable (TRUE) on machines that already have Visual Studio Code installed, but only if it is an older version.
Step 10: Final touches
Edit the Install/Upgrade: Visual Studio Code 1.7.1 - Windows Fixlet in the BigFix console.
Click on the Relevance tab
Click the + button to the far right of the windows of operating system statement added previously.
Add one of the relevance statements from the previous step. For Install/Upgrade it should be the following:
not exists keys whose(exists values "DisplayName" whose(it as string starts with "Microsoft Visual Studio Code") of it AND exists values "DisplayVersion" whose(it as string as version >= "1.7.1" as version) of it) of keys "HKEY_LOCAL_MACHINE\SOFTWARE\Microsoft\Windows\CurrentVersion\Uninstall" of (x64 registries; x32 registries)
Click on the Description tab
Add a description of some sort, like: “This fixlet will install or upgrade Visual Studio Code”
Make any other changes, like action settings locks (presets)
Click OK to save the changes
Uninstall Visual Studio Code from your test machine once again.
Click the Take Action button on the edited fixlet.
Choose the test machine, or enter it manually.
This time, the console should report Fixed as the status once the fixlet runs. This should mean that the fixlet was applicable (relevance was true) then the fixlet ran on the system, and then the fixlet was no longer applicable (relevance is false). This means that the relevance is now giving you real feedback on the results of the actionscript. Once the relevance is working properly like this, then a result of Fixed has real meaning. The result should be Fixed anytime the fixlet is run unless there is a problem from now on.
Now you are ready to deploy this software to other machines to see if it works properly there before putting this into production use.
Related:
- https://forum.bigfix.com/t/software-offering-for-new-registered-machines/24863/6